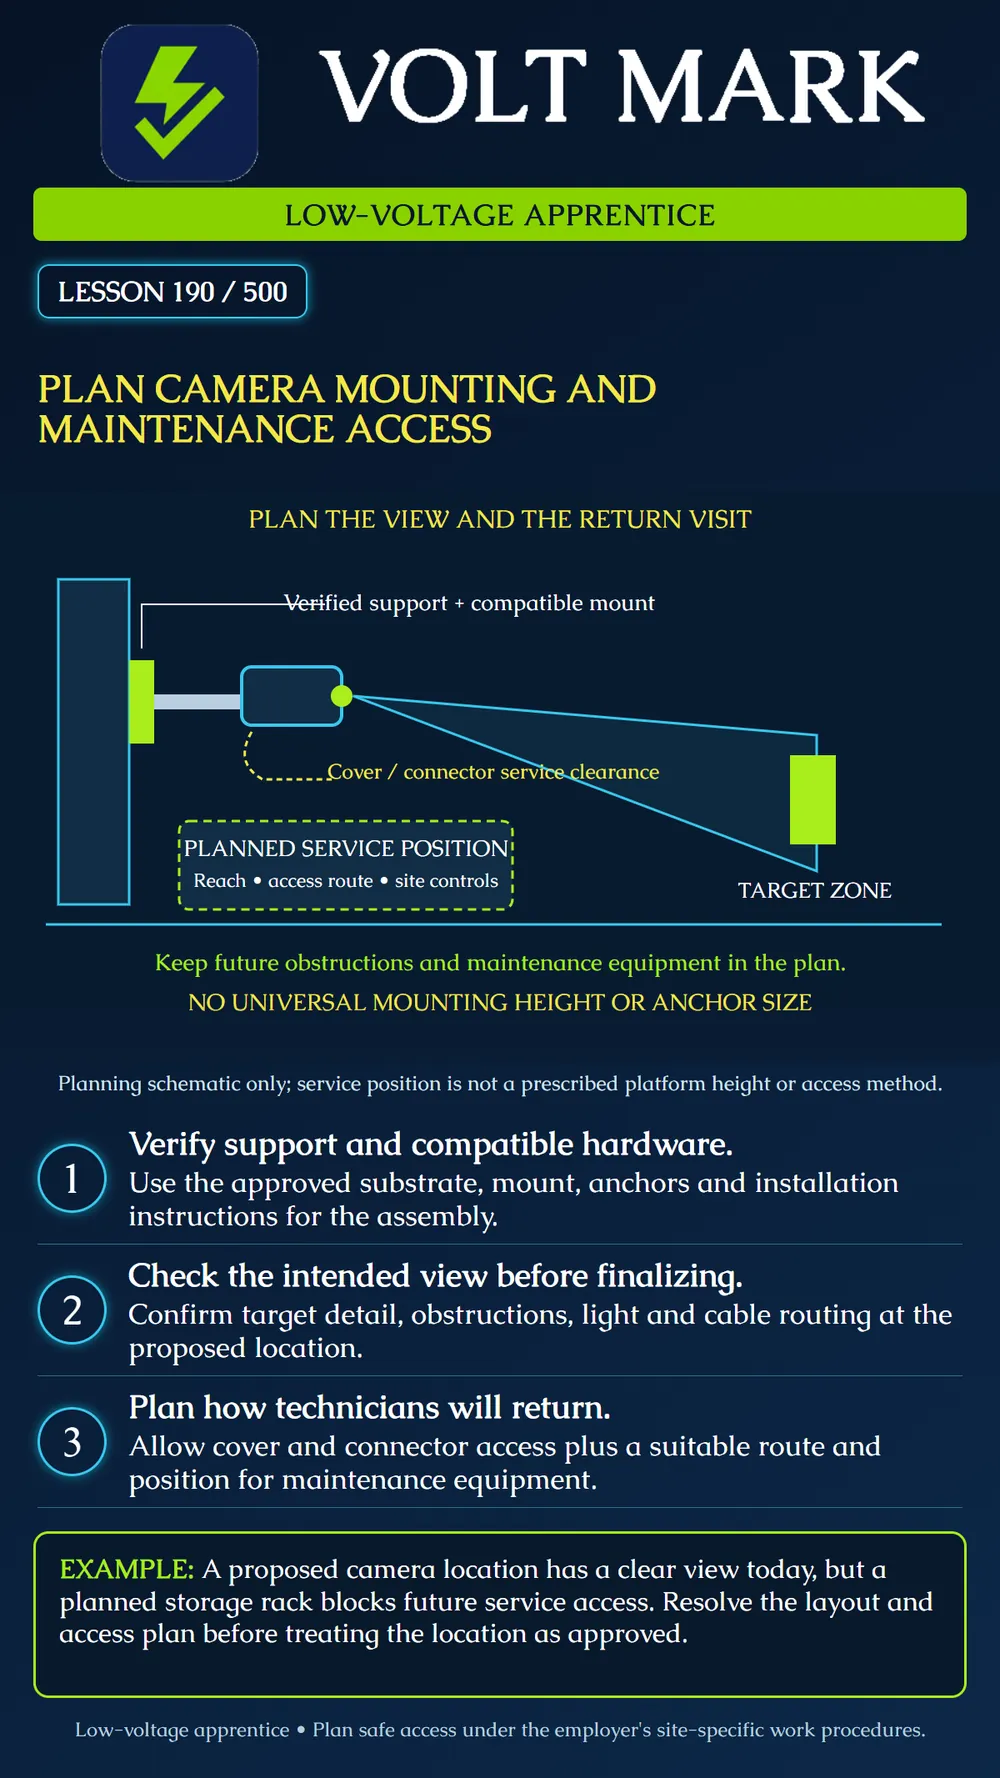
Prepare a camera location plan that addresses support, useful view, cable entry and future service access. A location is incomplete if the camera can be installed once but cannot reasonably be maintained.
Identify the actual supporting material and the approved attachment design. Verify the exact camera, housing, bracket and accessory combination. The older Axis 215 PTZ installation guide explicitly checks support against combined component weight; its numeric example is not a load rating for another installation. Outdoor supports may also need wind assessment. Axis explains effective projected area as a factor in wind loading of cameras and mounts. Weight alone does not establish adequacy of a pole, bracket or anchor. Obtain the applicable support design rather than selecting anchors from a drawing in this lesson. No universal anchor diameter, embedment, torque or mounting height is supplied.
A fictional camera must show a delivery parcel crossing a marked receiving zone. The proposed wall location has an unobstructed view while the building is empty. Overlay the planned storage racks, overhead doors and normal vehicle positions. Mark where a tall delivery vehicle could interrupt the view. Record the required target plane and the representative lighting conditions. Now plan a return visit to clean the optical surface, inspect the entry and replace the camera. The planned rack leaves no suitable service position. That is a design issue to resolve before handover, not a future technician's problem to improvise around.
The left support, mounting interface and camera are separate parts. A cyan viewing region points toward the target. A dashed yellow line indicates the concept of cover/connector clearance. The dashed green box represents a proposed service position to investigate. It is not a literal work platform, approved access equipment or a specified working height. The illustration supplies no dimensions or structural calculations.
Document intended target detail and the view from the proposed location. Check line of sight, backlight, nearby reflections and likely movement. A higher location may change the view of the target; it is not automatically a better location. Preserve the intended observation task when considering relocation for easier access. Conversely, do not accept an otherwise useful view without a workable service plan. Record tradeoffs and obtain the required design decision. Include enough cable-route detail to connect the location to the approved pathway. Keep environmental entry requirements from Lesson 189 in the plan.
List the actual anticipated tasks: opening a cover, reaching a connector, inspecting a gasket, cleaning a window, adjusting the view and replacing an assembly. Consult the product instructions for disassembly directions, tools, retained parts and necessary clearance. Ask whether a cover can open without striking a wall or overhang. Ask whether a replacement assembly can be handled without relying on the data cable to support it. Identify the manufacturer's retention provisions where applicable. Do not create a universal service-loop length; coordinate the actual cable type, bend limits, entry and movement needed for service.
OSHA's scissor-lift hazard alert emphasizes selecting equipment for site conditions, trained workers, stable positioning and controls for nearby traffic and overhead hazards. These principles inform the access plan; the lesson is not lift-operator training. Record a route and proposed setup area for whatever access method the employer selects. Check floor or ground conditions, doorway clearance, obstructions and conflicts with normal operations. Do not assume a ladder or lift will fit merely because one was used during construction. The employer's applicable procedures, equipment instructions and jurisdictional requirements govern the work. This lesson does not authorize energized work, climbing or lift operation.
Location A provides the desired image but the planned lift route is blocked by a permanent enclosure. Location B is accessible but a door leaf blocks the target whenever deliveries occur. Location C meets both initial checks, but its substrate and anchor design remain undocumented. For each, identify the unresolved item. None should be described as fully approved from this information alone. A useful review note assigns a responsible person, needed evidence and due point. Avoid vague notes such as "installer to figure out."
Save the camera ID, marked location, exact models, support reference, attachment detail, installation instructions, cable-entry plan, intended view and service method. Include representative view evidence, equipment access route, required operating coordination and unresolved conditions. After installation, record the as-built arrangement and any approved changes. If a later rack or partition changes access or coverage, the original drawing does not prove the new arrangement remains suitable.
Axis 215 PTZ Installation Guide: https://www.axis.com/dam/public/01/e1/fd/axis-215-ptz--installation-guide-en-US-38521.pdf Basis: model-specific support of combined assembly; no borrowed weight or fastener prescription. Axis, Effective projected area: https://whitepapers.axis.com/en-us/effective-projected-area Basis: wind-loading considerations for camera and mount. OSHA, Working Safely with Scissor Lifts: https://www.osha.gov/sites/default/files/publications/OSHA3842.pdf Basis: access-equipment planning and training principles. The alert is guidance, not a complete current compliance checklist.
Free study material for low-voltage apprentices. This is a national foundation course: requirements differ by state and by local jurisdiction, and a practice that is common in one place is not a rule everywhere. Nothing here is a licence, a certification, or authority to work unsupervised, and completing it does not count as apprenticeship hours or continuing-education credit. Check the codes adopted where you are working, the licensing authority for that work, and your employer's safety programme. VoltMark is not affiliated with, endorsed by, or sponsored by NFPA, OSHA, NICET, BICSI, FOA, or any state or local licensing authority.

Electrician licensing exam prep: practice questions, timed exam simulations, and step-by-step help finding every answer in the NEC.